How to Install a Metallic Epoxy Floor
Metallic epoxy can transform plain concrete into a seamless, high-gloss floor with depth, movement, and a one-of-a-kind appearance. Depending on the colours and application technique, the finished floor may resemble marble, polished stone, or flowing metal.
Installing metallic epoxy is not the same as painting a floor. It is a complete coating system in which concrete preparation, moisture control, mixing accuracy, application timing, and the protective topcoat all affect the final result.
Always read the product’s technical data sheet (TDS) and safety data sheet (SDS) before beginning. These documents establish the correct mix ratio, coverage rate, working temperature, recoat window, safety requirements, and cure time.

Metallic Epoxy Floor Installation Process
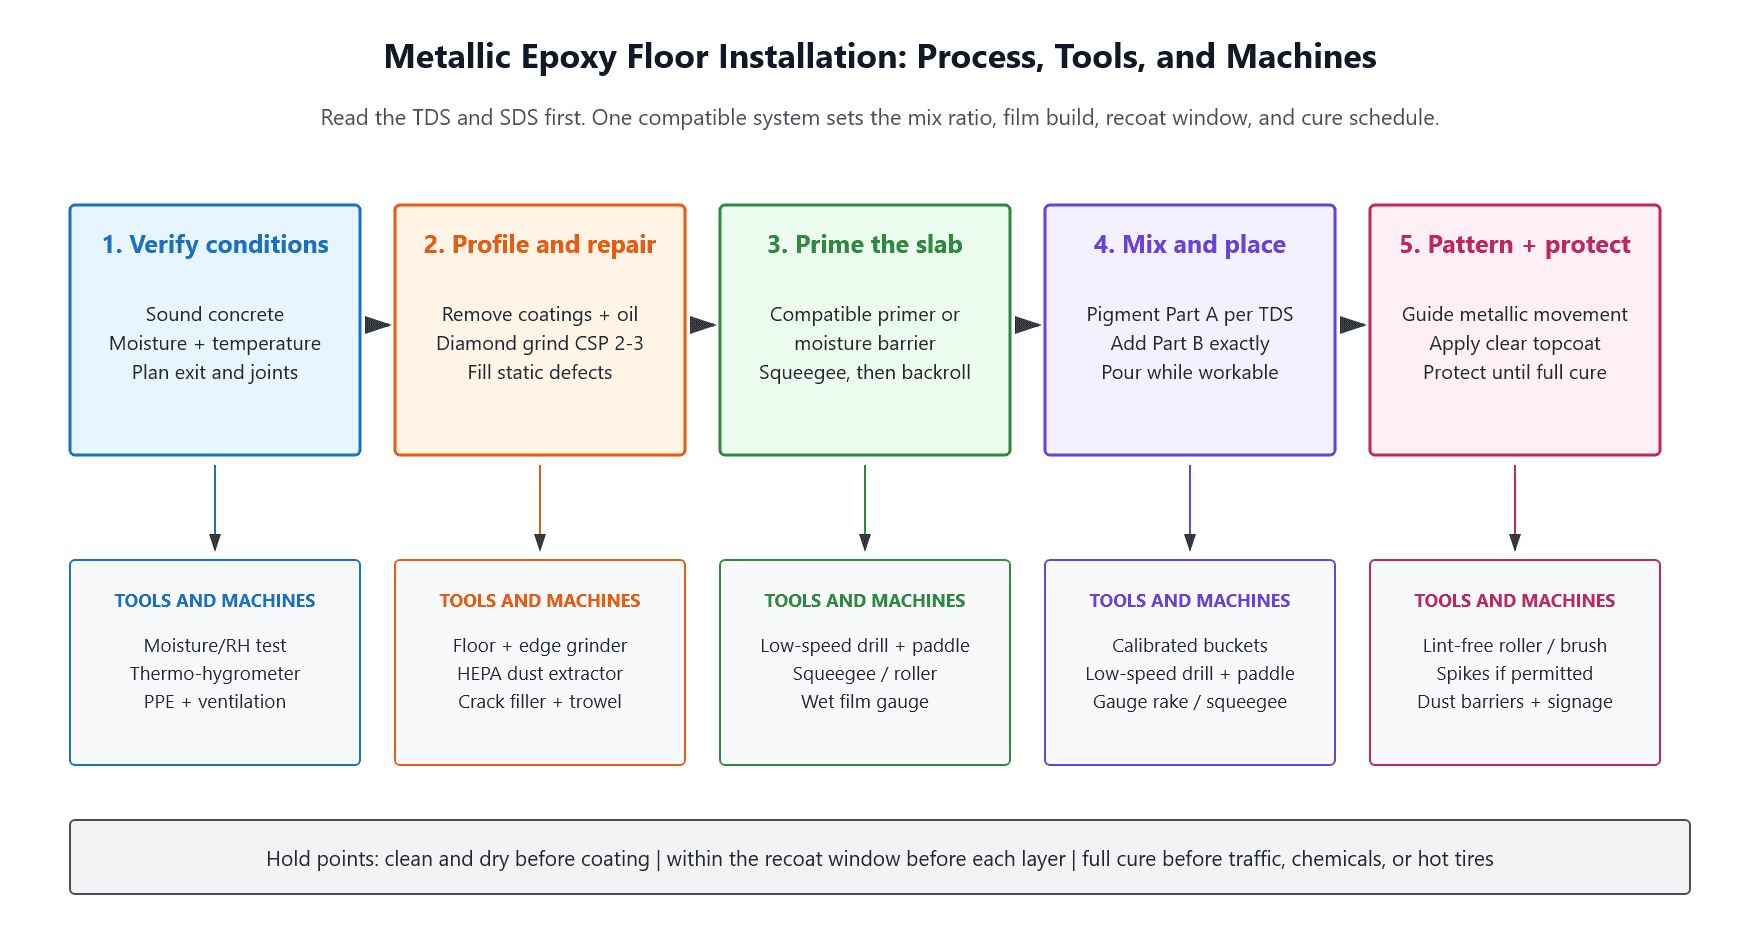
1. Verify Conditions → 2. Profile and Repair → 3. Prime the Slab → 4. Mix and Place → 5. Create the Pattern and Protect
| Step | Work Performed | Tools and Machines |
|---|---|---|
| 1. Verify Conditions | Confirm the concrete is sound. Test moisture, humidity, and temperature. Identify joints and plan a clear route to the exit. | Moisture or RH testing equipment, thermo-hygrometer, work lighting, PPE, and ventilation equipment |
| 2. Profile and Repair | Remove old coatings, oil, and contamination. Diamond grind the concrete to the required profile. Fill static cracks, pits, and damaged areas. | Walk-behind floor grinder, edge grinder, HEPA dust extractor, crack filler, scraper, and trowel |
| 3. Prime the Slab | Apply a compatible primer or moisture-control barrier. Spread it with a squeegee and backroll it evenly. | Low-speed drill, mixing paddle, squeegee, roller, and wet-film gauge |
| 4. Mix and Place | Disperse the metallic pigment into Part A when required. Add Part B using the exact ratio. Mix completely and pour while the material remains workable. | Calibrated buckets, low-speed drill, mixing paddle, gauge rake, and squeegee |
| 5. Create the Pattern and Protect | Guide the metallic movement, apply the compatible clear topcoat, and protect the floor until it reaches full cure. | Lint-free roller, brush, spiked shoes when permitted, dust barriers, and warning signs |
Important hold points: The concrete must be clean and dry before coating. Every layer must be applied within its approved recoat window. The completed floor must reach full cure before exposure to vehicle traffic, chemicals, heavy furniture, or hot tires.
Table of Contents
- Plan the system and assess the concrete
- Gather the tools, machines, and safety equipment
- Prepare and repair the concrete
- Prime the floor
- Mix the metallic epoxy correctly
- Place the metallic coat and create the pattern
- Apply the protective topcoat
- Cure, inspect, and maintain the floor
- Troubleshoot common problems
- Frequently asked questions
1. Plan the System and Assess the Concrete
Start with the condition of the concrete, not the colour chart. Metallic epoxy performs best over concrete that is sound, clean, dry, and mechanically profiled.
Decorative pigment cannot compensate for moisture vapour, oil contamination, failing paint, loose concrete, or moving joints that have not been handled correctly.
Inspect the complete floor and answer the following questions:
- Is the concrete structurally sound and reasonably flat?
- Has the floor been tested for moisture using a method accepted by the coating manufacturer?
- Are oil, silicone, wax, adhesive, paint, curing compounds, or old sealers present?
- Which cracks are static, and which joints must remain functional?
- Will the floor be exposed to sunlight, vehicle traffic, standing water, chemicals, or heavy equipment?
- Does the selected system require a moisture-control primer, tinted base coat, metallic body coat, and separate clear topcoat?
New concrete must cure for the period specified by the coating manufacturer before preparation begins. Do not assume an existing floor is ready simply because the surface looks dry.
Complete the required moisture testing and confirm that the slab temperature, air temperature, humidity, and dew point are within the product’s permitted limits.
For rooms exposed to sunlight, a compatible aliphatic polyurethane or polyaspartic topcoat may provide better colour stability than a clear epoxy finish alone.
In garages, entryways, and wet areas, consider a manufacturer-approved slip-resistant additive. Because traction additives can reduce the mirror-like appearance, prepare a sample board before coating the complete floor.
2. Gather the Tools, Machines, and Safety Equipment
Stage every tool before mixing the resin. Epoxy has a limited working time. Searching for a missing roller or discovering a blocked exit after mixing can leave visible defects in the finished floor.
Slab Inspection Equipment
- Moisture or relative-humidity testing equipment required by the system
- Thermometer and hygrometer
- Straightedge
- Bright portable work lights
Concrete Preparation Equipment
- Walk-behind diamond floor grinder
- Hand grinder for edges and corners
- Diamond tooling suitable for the concrete and existing coating
- HEPA-rated dust extractor
- HEPA vacuum
Repair and Cleaning Supplies
- Manufacturer-approved degreaser or cleaner
- Compatible crack and spall repair material
- Scrapers, trowels, and putty knives
- Clean, lint-free rags
Mixing and Application Equipment
- Low-speed drill and epoxy mixing paddle
- Clean, calibrated mixing buckets or an approved scale
- Mixing sticks and bucket liners
- Gauge rake or squeegee
- Lint-free rollers and roller frames
- Chip brushes for edges and cut-in work
- Masking tape and protective sheeting
- Small pour containers for accent colours
- Spiked shoes only when permitted by the product instructions
Personal Protective Equipment
- Nitrile gloves
- Splash goggles or suitable eye protection
- Protective clothing
- Hearing protection
- Respiratory protection required by the SDS
Keep the room ventilated, clean, and isolated from dust. Set up a dedicated mixing station away from direct sunlight and plan the application so the crew finishes at the exit.
For larger floors, use at least two people. One person can mix and pour while the second spreads and backrolls. This helps maintain a continuous wet edge.
3. Prepare and Repair the Concrete
Concrete preparation is the most important stage of the installation. The professional approach is mechanical preparation with diamond grinding rather than relying on a quick cleaning or acid-etching shortcut.
Grinding removes weak surface paste, contamination, and existing coatings while creating the surface profile required for adhesion. Many epoxy systems call for a Concrete Surface Profile of approximately CSP 2 to CSP 3, but the selected product system must determine the final requirement.
Clear and Protect the Room
Remove movable items, mask walls and transitions, isolate the work zone, and maintain a clean route to the exit.
Do not coat blindly over expansion joints or other moving joints. These areas require a system-specific treatment.
Remove Contamination
Treat oil, silicone, wax, adhesive, and other contaminants with a cleaner approved by the coating manufacturer.
Rinse or neutralize the concrete only when required by the product directions. Allow the slab to dry completely before continuing.
Diamond Grind the Floor
Diamond grind the main floor and use a hand grinder around edges, corners, and other restricted areas.
Use dust collection throughout the process. The prepared concrete should be uniformly open, clean, and matte without polished areas or deep gouges.
Repair Concrete Defects
Fill static cracks, pits, and spalls with a compatible repair material. After the repair cures, grind it flush with the surrounding concrete.
Active cracks and moving joints require a flexible, system-specific solution. A rigid repair may crack or become visible through the finished coating.
Vacuum Thoroughly
Vacuum the complete slab, including the edges, corners, cracks, and repaired areas.
Dust or debris left on the floor may weaken adhesion or become permanently visible beneath the metallic finish.
If the slab is damp, soft, powdery, heavily contaminated, or outside the permitted moisture limits, stop the installation. The floor may require additional remediation, a specified moisture barrier, or an evaluation by an experienced flooring professional.
4. Prime the Floor
Primer helps the coating bond to the prepared concrete, reduces uneven absorption, and creates a consistent background beneath the metallic layer.
Many metallic systems use a dark or tinted primer to increase visual depth. However, the correct primer, colour, coverage rate, and number of coats must come from the system specification.
Mix the primer exactly as directed by the TDS. Use a low-speed drill and the correct mixing paddle. Scrape the sides and bottom of the container and never estimate the mix ratio.
Pour the mixed primer onto the concrete promptly, spread it at the stated coverage rate, and backroll it evenly without excessive reworking.
Record the application time and monitor the recoat window. If the primer remains exposed beyond the maximum permitted time, it may need to be mechanically abraded and cleaned before applying the next layer.
5. Mix the Metallic Epoxy Correctly
The metallic layer creates the visual effect, but it is still a controlled chemical reaction. Accurate measuring, complete mixing, and careful timing are more important than improvisation.
Before mixing, arrange the rollers, squeegee, accent colours, clean containers, and personal protective equipment.
Condition all materials to the temperature range stated by the manufacturer. Warm conditions and large batches can shorten the available working time.
- Pre-mix Part A and disperse the metallic pigment when required by the product instructions.
- Measure Part A and Part B using the exact ratio provided by the manufacturer.
- Never estimate the ratio by eye or use a ratio from another product.
- Mix at low speed for the specified amount of time.
- Scrape the sides and bottom of the container to prevent unmixed pockets.
- Prepare only the amount the crew can place within the stated pot life.
- Pour the mixed epoxy onto the floor promptly.
Epoxy left inside a mixing bucket can generate heat and lose working time faster than material spread across the concrete.
Do not add solvents, excess pigment, or unapproved additives to change the appearance or flow. These changes can interfere with curing, film thickness, colour consistency, adhesion, and warranty coverage.
6. Place the Metallic Coat and Create the Pattern
Begin at the farthest point in the room and work toward the exit.
Cut in the edges shortly before coating the adjoining field so the two areas remain wet enough to blend together.
Pour the metallic epoxy in controlled ribbons or pools. Spread it at the specified film thickness and backroll only as much as the manufacturer recommends.
Excessive rolling can flatten the metallic movement, introduce roller fibres, or leave an unwanted texture.
Metallic floors naturally vary from one area to another. For a calm, stone-like appearance, use a consistent base colour and restrained movement.
For a more dramatic finish, apply planned accent pours, gentle sweeps, or controlled swirls while the coating remains within its working window.
Prepare a sample board before combining colours on the actual floor. A sample makes it easier to judge the contrast, movement, and final sheen without risking the complete installation.
Avoid open flames, random solvents, and unsupported resin-art techniques. These methods can create fire hazards, health risks, curing problems, and adhesion failures.
Use only decorative techniques approved by the floor-coating manufacturer.
7. Apply the Protective Topcoat
Once the metallic layer reaches its approved recoat stage, apply a compatible clear topcoat.
The topcoat protects the decorative layer from abrasion, stains, chemicals, and routine cleaning. It also determines the floor’s final sheen.
Select the topcoat according to the room’s conditions. A compatible clear epoxy may suit certain indoor systems, while an aliphatic polyurethane or polyaspartic finish may provide improved colour stability in areas exposed to sunlight.
Where traction is important, add only the slip-resistant material approved for the selected topcoat.
Apply the product with the recommended roller or squeegee, at the specified coverage rate, and within the required recoat window.
Protect the room from dust, moisture, insects, and foot traffic throughout the curing period.
8. Cure, Inspect, and Maintain the Floor
Follow the curing schedule provided on the product data sheet.
Air temperature, concrete temperature, humidity, film thickness, and coating chemistry can all affect when the floor is ready for recoating, foot traffic, vehicles, heavy loads, or chemical exposure.
Before returning the floor to service:
- Confirm that the coating is no longer tacky.
- Inspect the sheen for consistency.
- Check edges, transitions, and repaired areas for complete coverage.
- Keep heavy furniture, rolling loads, hot tires, and chemicals off the floor until the specified full cure is complete.
- Lift furniture into place instead of dragging it across the new coating.
For routine maintenance, remove grit with a dust mop or vacuum, wipe spills promptly, and clean the floor with a pH-neutral product approved for resinous coatings.
Avoid abrasive pads, strong solvents, and cleaners that leave a heavy residue. Use protective pads beneath heavy equipment and place mats at entrances where water or grit may be tracked inside.
9. Troubleshooting Common Metallic Epoxy Problems
Fish Eyes or Bare Spots
Likely cause: Oil, silicone, wax, or another contaminant prevented the coating from wetting the surface.
Recommended response: Stop and identify the contaminant. Remove or isolate it using the repair method approved for the coating system before recoating.
Pinholes or Bubbles
Likely cause: Porous concrete, trapped air, moisture, or unsuitable application conditions.
Recommended response: Correct the substrate or primer problem. Repair and recoat only as permitted by the manufacturer.
Soft or Tacky Coating
Likely cause: An incorrect mix ratio, incomplete mixing, expired material, or temperatures outside the approved range.
Recommended response: Keep people and equipment away from the area and contact the product manufacturer’s technical-support team. Do not apply another coat over uncured material.
Roller Marks or an Inconsistent Pattern
Likely cause: A lost wet edge, excessive rolling, the wrong roller, or inconsistent batch timing.
Recommended response: Sand and recoat only if permitted by the system. During future applications, use smaller work sections and a clearer mixing and placement schedule.
Frequently Asked Questions
Can metallic epoxy be applied over old paint, tile, or an existing coating?
Sometimes, but only when the existing surface is firmly bonded, compatible with the new coating, and prepared according to the manufacturer’s directions.
Removing the existing material and mechanically preparing the concrete is often the more dependable approach.
Will metallic epoxy turn yellow?
Epoxy can amber when exposed to ultraviolet light. A compatible UV-stable topcoat can improve colour retention, but it must be approved for use with the complete flooring system.
Is metallic epoxy a realistic do-it-yourself project?
A small, uncomplicated interior floor may be manageable for a properly equipped and prepared DIY team using a complete system.
Moisture problems, extensive repairs, large pours, occupied buildings, and strict appearance requirements significantly increase the risk. These conditions are good reasons to hire an experienced resin-floor installer.
How long does metallic epoxy installation take?
Most installations require several stages because preparation, repairs, primer, the metallic coat, the topcoat, and final curing each have separate timing requirements.
Build the installation schedule around the technical data sheets for the selected products rather than relying on a generic weekend-flooring promise.
When can furniture or vehicles return to the floor?
The answer depends on the selected coating system and jobsite conditions.
Light foot traffic may be permitted before the coating reaches its full chemical and mechanical cure. Follow the manufacturer’s schedule for furniture, rolling loads, vehicle traffic, hot tires, water, and chemical exposure.
Final Takeaway
A durable metallic epoxy floor is built in layers: a stable and properly profiled concrete slab, a compatible primer, a carefully mixed decorative coat, a protective clear finish, and enough cure time for the complete system to harden properly.
Take surface preparation and application timing seriously, test the colour design on a sample board, and allow the product instructions to control every stage.
That is how a metallic epoxy floor looks intentional when first installed and continues performing long after the initial shine wears in.
0 Comments